My IP Upload: Difference between revisions
Jump to navigation
Jump to search
Cmseditors (talk | contribs) No edit summary |
Cmseditors (talk | contribs) No edit summary |
||
| Line 11: | Line 11: | ||
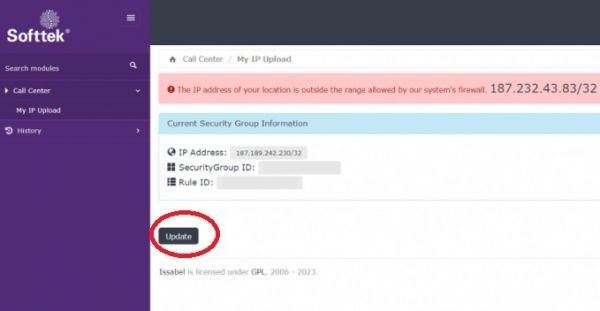
;Step 2: The main screen of the module will show the IP address that is currently registered. If the registered IP differs from the IP detected at that time, the module will automatically enable the update button to be able to change the trusted IP address. | ;Step 2: The main screen of the module will show the IP address that is currently registered. If the registered IP differs from the IP detected at that time, the module will automatically enable the update button to be able to change the trusted IP address. | ||
:[[File:firewall-problems.jpg| | :[[File:firewall-problems.jpg|600px|link=|caption]] | ||
;Step 3: Just click on the black update button and that's it. | ;Step 3: Just click on the black update button and that's it. | ||
Revision as of 14:47, 5 March 2025
If you change internet providers, or your internet provider changes the IP address pointing to the security group, you will need to update your internet IP address in the module "My IP Upload". This module allows an online status on MicroSip; the best and most secure way to update your IP address in the firewall without any help.
Usage requirements
- Chrome browser.
- URL and credentials.
- To get a new QR code for two-factor authentication, you'll need to enable the authenticator app with your key. Then, you can generate the QR code.
How to update my IP Address
- Step 1
- Sign in to the Issabel Call Manager and open the My IP Upload module.
- Step 2
- The main screen of the module will show the IP address that is currently registered. If the registered IP differs from the IP detected at that time, the module will automatically enable the update button to be able to change the trusted IP address.
- Step 3
- Just click on the black update button and that's it.

