Configuring my extension ( on iPhone ): Difference between revisions
Jump to navigation
Jump to search
Cmseditors (talk | contribs) No edit summary |
Cmseditors (talk | contribs) No edit summary |
||
| (8 intermediate revisions by the same user not shown) | |||
| Line 14: | Line 14: | ||
==Register your extension== | ==Register your extension== | ||
*Go to [[My IP Upload]] module on Issabel and update your IP in the firewall | *Go to [[My IP Upload]] module on Issabel and update your IP in the firewall | ||
* | *Open the Zoiper app | ||
*Allow the Zoiper permissions, tap ‘Allow’ | |||
:“Zoiper” Would Like to Send You Notifications – Tap ‘Allow’ | |||
:“Zoiper” Would Like to Access the Microphone – Tap ‘Allow’ | |||
:“Zoiper” Would Like to Access the Camera – Tap ‘Don´t Allow’ | |||
:“Zoiper” Would Like to Access Your Contacts- Tap ‘Don´t Allow’ | |||
*Tap settings (The ‘gear’ icon) | |||
*Tap on ‘Accounts’ | |||
*Tap on the + and select ‘Yes’ | |||
*Select ‘Manual configuration’ | |||
*Select ‘SIP account’ | |||
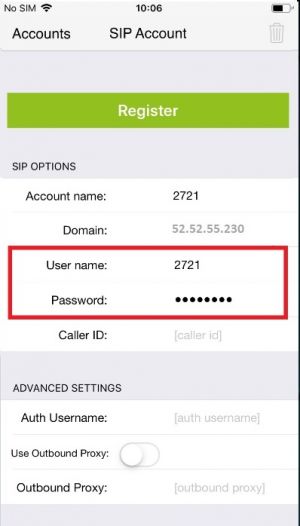
*Enter the ‘Account name’ (Extension Number) | |||
*Enter the ‘Domain’ which you may find via email | |||
*Enter the extension ‘User Name’ (Extension Number) and ‘Password’ (Pwd) which you may find via email | |||
:[[File:Zoiper-setup-iphone.jpg|300px|link=|caption]] | |||
*Tap on ‘Register’ | |||
*Go back to the dialler to make your call | |||
{{ContacUs}} | {{ContacUs}} | ||
[[Category:FAQ]] | [[Category:FAQ]] | ||
Latest revision as of 21:43, 23 February 2024
In order to connect to your telephone system, you will need to know:
- -Account type: SIP
- -Hostname: Ip address. It is often named domain or registrar.
- -The default SIP port: 5060.
- -Extension number: This is the username for your account.
- -Password: This is the password for your account.
Download ZoiPer
- Open the Apple ‘App Store’ on your phone
- Search for ‘Zoiper Lite voip soft phone’ in the App Store
- Install the app
Register your extension
- Go to My IP Upload module on Issabel and update your IP in the firewall
- Open the Zoiper app
- Allow the Zoiper permissions, tap ‘Allow’
- “Zoiper” Would Like to Send You Notifications – Tap ‘Allow’
- “Zoiper” Would Like to Access the Microphone – Tap ‘Allow’
- “Zoiper” Would Like to Access the Camera – Tap ‘Don´t Allow’
- “Zoiper” Would Like to Access Your Contacts- Tap ‘Don´t Allow’
- Tap settings (The ‘gear’ icon)
- Tap on ‘Accounts’
- Tap on the + and select ‘Yes’
- Select ‘Manual configuration’
- Select ‘SIP account’
- Enter the ‘Account name’ (Extension Number)
- Enter the ‘Domain’ which you may find via email
- Enter the extension ‘User Name’ (Extension Number) and ‘Password’ (Pwd) which you may find via email
- Tap on ‘Register’
- Go back to the dialler to make your call
If your problem persist
If you are unable to get the configuration working, please contact us at itis.cmsupport@softtek.com. To help us resolve this quickly, please include:
- -Your Public IPv4: (Found at https://checkip.amazonaws.com/)
- -Screenshot of Settings:
Ctrl+P
- -Screenshot of Account:
Ctrl+M
- -Issue Description: A brief summary of the problem you are facing.
